
Here you'll find answers to common questions our clients ask. Start by selecting one of the links below. If you don’t see what you need – call or contact us online.
-
Are you a “green” company?
We take very seriously our role in preserving the environment and integrate numerous green practices into our daily operations. In addition to energy-efficient equipment and chemical-free technologies, we can perform many print jobs using recycled paper stock. If you would like to use recycled paper for your next print job, let us know. You’ll be pleased with the results and feel good about helping the environment, too.
-
At what resolution should I save my photos and graphics?
Resolution should be set to 300 dpi.
Pictures and graphics pulled from the internet are often low resolution, typically 72 dpi or 96 dpi. Avoid these graphics, as they will appear pixilated and blocky when printed.
Also note that you should save all photos in CMYK mode, not RGB mode when possible. Images saved in RGB mode may not print properly. If you are unable to save your image in CYMK mode, please let us know.
-
Yes, you're welcome to send files (even very large files) to us through our website here. Please Stuff your files if you're working on a Mac or ZIP your files if you're working on a PC. Avoid compressing and sending Mac files from a PC and vice versa.
-
Can you accept press-ready PDFs?
Yes, we can accept press-ready PDF files, including PDF/X-1a files. In fact, in many cases, we prefer them because we’re able to process your job right away, without much of the setup required for native files! Download our Adobe PDF presets for InDesign, Illustrator and Acrobat Distiller here.
-
Well, since you are here, we would suggest you use our online estimate request form here. Otherwise, the best way to ensure that we get all the information necessary to do an accurate quote, email or FAX the specs to us or give us a call and talk with one of our customer service representatives.
-
How do I proof a PDF accurately?
Whoa! Hold on there partner. Please understand that PDFs are a bad substitute for printed, color calibrated proofs, but sometimes they are a neccessary evil because they help to save time and shipping costs. Don’t let ANYONE tell you that PDFs are as good as a printed proof. They’re not. Proofing PDFs for color is a bad idea.
We offer printed proofs on every project, and encourage you to have your customer sign off on them. The cost of each printed proof is built into every product in this catalog, but there are additional costs for shipping printed proofs. Plus, we’ll need the signed proof back before we can go to press, so schedule accordingly. All things considered, the shipping costs involved in getting printed proofs to and from your customer equates to very cheap insurance, especially if your customer hired a less than qualified designer.
If you still need to proof a PDF due to time constraints, keep in mind that the file supplied for your print job is only as good as the person who created it, and a supplied PDF file is no different. If the file you provide is not created by a qualified designer, there will be problems with it. There are tools in Adobe Acrobat Professional that provide an opportunity to catch most file errors. Here’s how you use them:
• First, you’ll need Adobe Acrobat Professional. Acrobat Reader does not provide all of the tools you need to examine a PDF. Acrobat Pro is less than $500, but is money well spent if you choose to proof PDFs.
• Local Fonts and Overprint Preview. By default, Acrobat is set to display the fonts found on your computer and not the fonts in the PDF. This is bad. We always want Acrobat to display the fonts from the PDF. Also, the Overprint Preview setting is off by default, but it should always be on when proofing PDFs. To change these settings:
a) In Acrobat Pro version 6 or 7, go to the ADVANCED menu and deselect Use Local Fonts. Additionally, in the ADVANCED menu, select Overprint Preview to turn it on. Now verify that there is not a check by Use Local Fonts and that there is a check by Overprint Preview in the ADVANCED menu.
b) In Acrobat Pro version 8 or 9, go to PREFERENCES then Catagories and finally, Page Display. In the Rendering section deselect Use Local Fonts, and in the Page Content and Information section select Overprint Preview. Now verify that there is not a check by Use Local Fonts and that there is a check by Overprint Preview. Click OK to accept your changes.• Preflight tool. This is the most valuable tool in Acrobat Professional. Here you can examine almost every aspect of a PDF file. Go to the ADVANCED menu and choose Preflight at the bottom of the menu. Once the Preflight profiles load, scroll down the list until you find and then double click on the List all images profile (in Acrobat 8 and 9 it’s in the PDF analysis section; see screen shot below). The results will show the resolution and color mode of the images in the PDF. In the screen shot below, one photo is 350 dpi and CMYK, perfect for print. The next photo is only 200 dpi and RGB, which is unacceptable. The rule of thumb is that color and grayscale images should be between 300 and 400 dpi. If any images are listed as RGB, they should be converted to CMYK in Photoshop (or a similar image editing program), updated in the layout file and then a new press-ready PDF should be made.
• Output Preview. This tool provides a view of all of the color separations in a PDF (see screen shot below). Four-color process jobs should not list any Spot colors here because if it’s in this list, it’s in the file. This is a common oversight for even seasoned graphic designers, who supply files for process jobs with extra Spot colors without understanding the risks. Soft effects like drop shadows and transparency should only be used with process colors when that job will be printed in process color (all products in this catalog are printed in process color). Don’t rely on the “Convert Spot Colors to Process” option, convert all spot colors to process in your Swatches palette and support images BEFORE saving or exporting your PDF. To open Output Preview:
a) In Acrobat Pro version 6 or 7, go to the ADVANCED menu and choose Output Preview.
b) In Acrobat Pro version 8 or 9, go to the ADVANCED menu, then Print Production and choose Output Preview. -
Is white considered a printing color?
Not typically. Because white is the default color of paper, it is simply recognized as the absence of any ink. However, when using colored paper, white ink may be used if any text or graphic requires it.
-
Tips on how to save your design files
Make them print ready and acceptable for us to print.
COREL DRAW:
Saving your Corel Draw file as an Adobe Illustrator EPS
• Embed all Images
• Convert all your text/copy to outline fonts
• Export as Illustrator EPSFREEHAND:
• Embed all Images
• Convert all your text/copy to paths
• Export as Illustrator EPS or PDFPAGEMAKER:
Saving your PageMaker file as an EPS
• Embed all Images
• Convert all your text/copy to outline fonts
• Export your file as an EPS using the below settings:
Postscript Level 2
CMYK Mode
TIFF format and
BinaryPUBLISHER:
You will need to have the full version of Adobe Acrobat PDF. If you don’t please download and use our Adobe Job Ready Program. If you do have the full version of Adobe Acrobat PDF please follow the steps below.
Under File, Print, select Adobe PDF writer
Under Properties select Press Quality and Save your PDF -
What are native files?
If you have built your job in InDesign, for example, the native files are the InDesign layout, all of the support images and all of the fonts used in the job. Use the Package feature to gather all of the files together.
-
What are your design requirements for Cling-Z?
4-color process only, no PMS colors. No aqueous coatings. Light to medium coverage, approximately 60% maximum coverage, no heavy solids. Keep ink density below 220%. Bleeds are not recommended because the ink at the edges reduces the static charge of the sheet. A white margin of .25" (for 8.5" x 11") or .5" (for 11" x 17" and 18" x 24") is highly recommended.
-
 What are your guidelines for supplying press-ready PDF files?
First, follow all of the guidelines in the native files section, otherwise your PDF will not be press-ready. Additionally, there are several key requirements for supplying us with good, press-ready PDFs:
• Create a high resolution PDF with high resolution CMYK images. Of course, the source images must be high res to begin with; you can’t build your job with low res images and then “res them up” when you create your PDF. Make certain that all of your images are converted to CMYK before creating your PDF. Use the preflight tools in Acrobat to check your PDF before you send it to us. Please see the Prepress FAQ section titled “How Do I Proof a PDF Accurately?” for complete details.
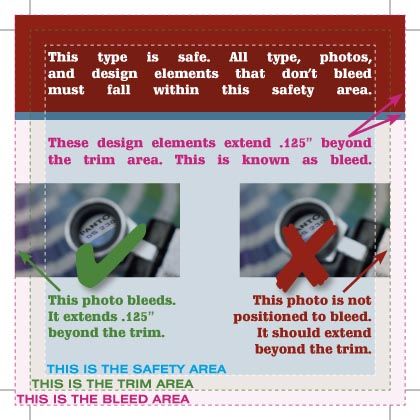
• If your job requires bleeds, your PDF must include a minimum of .125" bleeds. For instance, if your job is an 8.5" x 11" flyer that bleeds (color, images or design elements extend to the trim), your PDF must be larger than 8.5" x 11" to include the bleeds. We recommend making the PDF .5" larger on all four sides, so an 8.5" x 11" page would be 9.5" x 12". Make certain your content is centered in the PDF. Open your PDF and check the dimensions before you send it to us. In Acrobat 6 and earlier, the PDF dimensions are displayed in the lower left corner of the screen. In Acrobat 7, 8 and 9, just hover your mouse in the lower left corner of the Acrobat window to display the dimensions of the PDF.
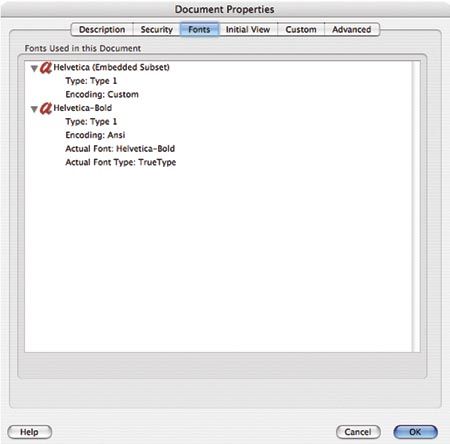
• Embed ALL of the fonts in the project in the PDF, or convert all of the type to curves (also called outlines or paths) before creating your PDF. To double-check your work before sending it to us, open your PDF in Acrobat, go to the FILE menu and choose DOCUMENT PROPERTIES, click on Fonts and verify that each font has either “Embedded” or “Embedded Subset” in parenthesis after the font name. If any font in the list isn’t embedded, the PDF is not press-ready. (See the sample image to the right.)
-
 What are your guidelines when I supply native files to you?
• Include your layout file, all of the images used in the job AND all of the fonts used in the job, including fonts used in placed EPS files. Always “Collect For Output” from Quark or “Package” your job from InDesign, and select all of the options to include images AND fonts (both printer and screen). Make certain that all of your images are updated. Do NOT send a file in which some or all of the images are listed in the Picture Usage or Links palette as “Modified”.
• Your layout file should be setup for the trim size of the job and bleeds should extend beyond the page boundary .125". For example, a 6" x 4.25" postcard should be built on a 6" x 4.25" page with bleeds pulled .125" beyond the boundary. Please DO NOT build a small postcard (or any other odd size piece) in the middle of an 8.5" x 11" or larger page. Also, do not build the front and back of a job on the same page in your layout file. Precise page sizes are very important today with digital impositioning; we can no longer run film on small pieces and strip them together mechanically.
• All supplied images MUST be CMYK for four-color process jobs. Images supplied as RGB require a conversion to CMYK at an additional cost and may delay your project, so we’d prefer to have you do the conversion to keep your project on track.
• Images should be a minimum of 300 dpi at 100%, but more than 400 dpi is overkill. Lineart bitmaps should be a minimum of 600 dpi, but no more than 1200 dpi.
• Images should be supplied as TIFFs or EPS files. You may use LZW compression in your TIFFs, but don’t use JPEG encoding in your EPS files (always use Binary encoding). JPEGs are not accepted.
• For four-color process jobs, convert all spot colors to process in your swatch palette and support images BEFORE saving or exporting your PDF. Don’t rely on the “Convert Spot Colors to Process” option. This step is often overlooked and is especially critical when transparency effects are used (drop shadows, etc).
• Bleeds must be .125". (See the sample image to the right.)
• ALWAYS include all of the fonts used in your job!! We will not substitute fonts with ours because the results could be startlingly different; it is not a risk you should be willing to take. Also include fonts used in placed EPS files or convert those fonts to outlines.
-
What do you charge for Prepress changes?
We understand that files will occasionally come to us in need of repair or changes, and we are happy to fix or make corrections, if possible. We charge $90/hr for repairs, changes, dieline drawings, color corrections and other prepress computer work. Additional color proofs are required after many changes at a cost of $60 each. Additional digital bluelines are $20 each.
-
What file format should I use when submitting my electronic document for printing?
PDF (Portable Document Format) is the most common and preferred file format for submitting digital documents. With the installation of a PDF print driver on your computer, virtually any program can generate a PDF file suitable for printing. Both commercial and free PDF print drivers are available online for download from different sources.
-
What file formats do you support?
Mac software supported:
- Adobe Acrobat 8 PDF (Version 1.7)
- Adobe Illustrator CS5 (Version 15.0)
- Adobe Indesign CS5 (Version 7.0)
- Adobe Photoshop CS5 (Version 12.0)
- Macromedia Freehand MX (Version 11.0)
- QuarkXPress 7PC software supported:
- Adobe Acrobat 8 PDF (Version 1.7)
- Adobe Illustrator CS5 (Version 15.0)
- Adobe Indesign CS5 (Version 7.0)
- Adobe Photoshop CS5 (Version 12.0)
- Microsoft Excel ($90 Upcharge per file)*
- Microsoft PowerPoint ($90 Upcharge per file)*
- Microsoft Publisher 2003 ($90 Upcharge per file)*
- Microsoft Word ($90 Upcharge per file)** These files may not print exactly as expected - proofs are required
* Hi-Res, Print-Ready PDFs can be supplied to avoid the $90 upcharge
CorelDraw is not supported - Export as Illustrator AI file w/type converted to curves -
What is a "proof"?
A proof is a way of ensuring that your file was setup accurately and that everything is positioned according to your requirements. We will produce a printed proof which is color calibrated to our presses and can be viewed at our shop or delivered to you in person. PDF proofs are also available for many projects, but are less realiable than printed proofs. Please see the Prepress FAQ section titled “How Do I Proof a PDF Accurately?”
-
What is the Pantone Matching System?
The Pantone Matching System (PMS) is a color reproduction standard in which colors all across the spectrum are each identified by a unique, independent number. The use of PMS allows us to precisely match colors and maintain color consistency throughout the printing process.
-
What media formats do you accept?
- CD-ROM
- DVD-R, DVD+R, DVD-RW and DVD+RW
- USB Thumbdrives
- Email for files less than 4MB in size
- Upload your files through our website
- Use a file transfer service like www.box.net or www.yousendit.com. -
Good question! We are a full service shop and offer a wide range of products and services. To see a full listing and description of what we can offer you, check out the Products & Services area in the Customer Service Section of our website.
-
Why do the printed colors look different from the colors on my screen?
In short, printers and monitors produce colors in different ways.
Monitors use the RGB (red, green, blue) color model, which usually supports a wider spectrum of colors. Printers use the CMYK (cyan, magenta, yellow, black) color model, which can reproduce most—but not all—of the colors in the RGB color model. Depending on the equipment used, CMYK generally matches 85–90% of the colors in the RGB model.
When a color is selected from the RGB model that is out of the range of the CMYK model, the application chooses what it thinks is the closest color that will match. Programs like Adobe Photoshop will allow you to choose which color will be replaced. Others may not.